
What you will build
A small 2WD or 4WD robot car powered by Raspberry Pi 4 or Raspberry Pi 5. It can drive forward/backward, turn left/right, and it will stop/turn when it detects an obstacle using an HC-SR04 ultrasonic sensor.

Parts list (with shopping links)
These are examples from common reputable stores. You can swap brands - just match the part type.
Raspberry Pi 4 or Raspberry Pi 5
Either works. Pi 5 is faster.
Official Power Supply
Pi 5: official 27W USB-C PD recommended. Pi 4: official 15W USB-C is fine.
microSD Card (32GB+)
Use a name brand A1/A2 card. Cheap fakes cause random crashes.
Robot car chassis + motors (2WD or 4WD)
2WD is easiest. 4WD is fine and gives more traction.
Motor driver (choose one)
TB6612FNG runs cooler than L298N. L298N is common and beginner-friendly.
Ultrasonic distance sensor (HC-SR04)
Important: the Echo pin is 5V. Use a resistor divider to protect the Pi.
Battery holder / motor battery
Beginner-safe option: 6xAA NiMH to power motors + driver. (Pi uses its own USB-C supply.)
Optional: Buck converter (if you want one battery)
LM2596 step-down can be used to make 5V from a higher battery. Only do this if you know what you're doing.
Blunt truth (so you don't fry the Pi)
- Motors cause voltage dips + noise.
- If the Pi shares motor power, it will reboot or corrupt the SD card.
- Use separate motor power and tie grounds together (GND).
Build steps (detailed)
Step 1 - Assemble the chassis
- Mount motors to the chassis.
- Press/attach wheels firmly.
- Install caster wheel (if included).
- Mount the battery holder.
- Mount the Raspberry Pi on standoffs (do not let it touch metal).
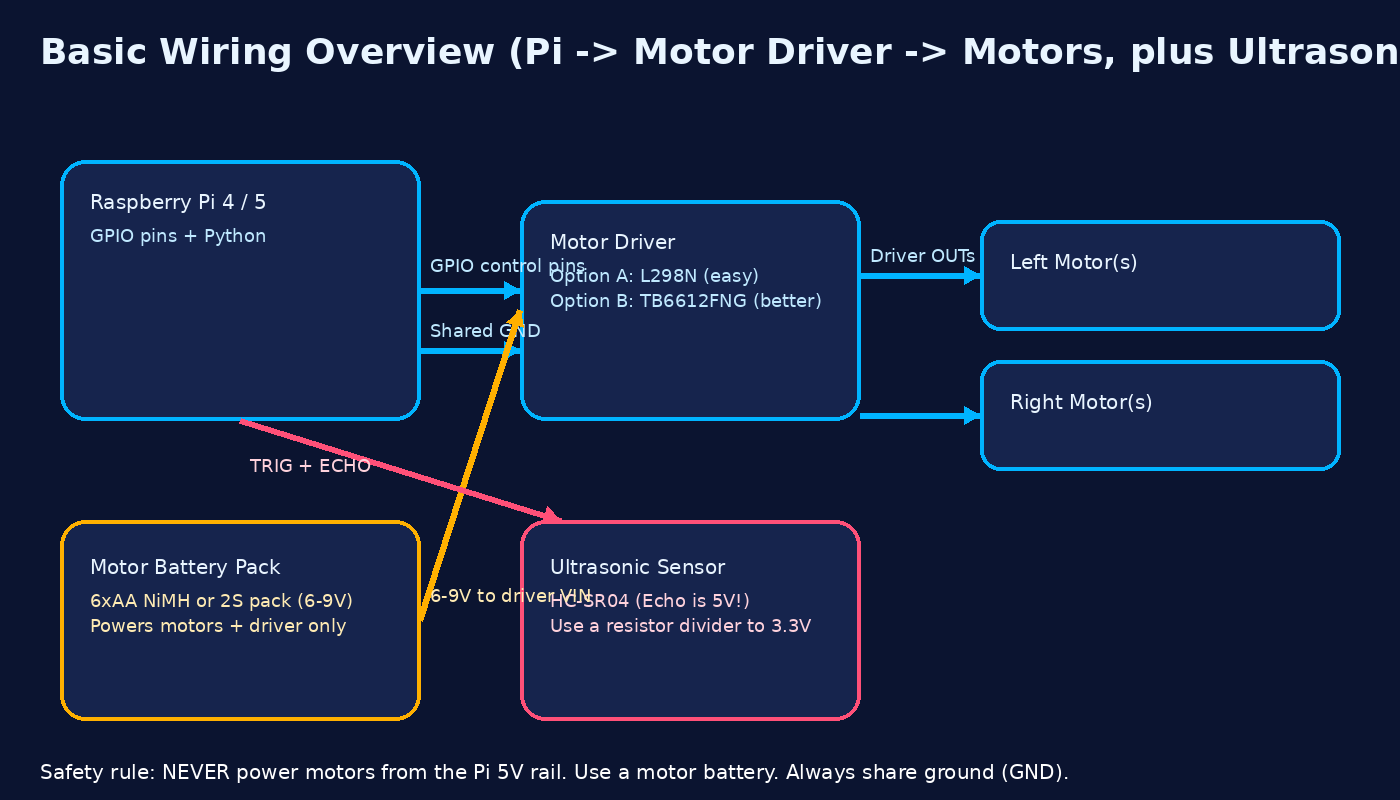
Step 2 - Wiring the motor driver (detailed)
We will use this GPIO mapping (BCM):
- IN1 → GPIO17
- IN2 → GPIO18
- IN3 → GPIO22
- IN4 → GPIO23
- Pi GND → Motor driver GND
2.1 Power & ground (do this first)
- Power the Raspberry Pi from its own USB-C power supply (official PSU recommended).
- Power the motors + motor driver from a separate motor battery pack (for example 6xAA NiMH).
- Tie all grounds together:
- Pi GND → Motor driver GND
- Motor battery negative → Motor driver GND
Never use the Pi's 5V pin to power the motors. Motor noise and current spikes will reboot or kill the Pi.
2.2 Driver inputs: Pi → motor driver
Wire the Pi GPIOs to the driver’s control pins:
- GPIO17 → IN1
- GPIO18 → IN2
- GPIO22 → IN3
- GPIO23 → IN4
If your board has enable pins:
- TB6612FNG: tie STBY high (to 3.3V) to enable outputs.
- L298N: tie ENA and ENB high (jumpers or 5V) so the channels are enabled.
Optional (speed control): connect PWMA/PWMB or ENA/ENB to Pi PWM-capable pins and use PWM in code. If you don’t care about speed yet, just tie them high for full power.
2.3 Motors: driver → motors
For a 2WD robot:
- Left motor + → OUTA1 (or OUT1)
- Left motor − → OUTA2 (or OUT2)
- Right motor + → OUTB1 (or OUT3)
- Right motor − → OUTB2 (or OUT4)
If a wheel spins backwards, swap the + and − wires for that motor only.
2.4 Motor battery → motor driver
- Motor battery + → VM / 12V / VIN (motor power input)
- Motor battery − → Motor driver GND
The Pi does not get power from this battery. It still uses its own USB-C power.
Step 3 - Wiring the ultrasonic sensor safely (detailed)
We’ll use an HC-SR04 ultrasonic sensor.
Target wiring:
- VCC → Pi 5V
- GND → Pi GND
- TRIG → GPIO24
- ECHO → GPIO25 through a resistor divider
3.1 Why you need a level shifter
The HC-SR04 ECHO pin outputs around 5V. Raspberry Pi GPIO pins are only safe up to 3.3V. We drop 5V down to ~3.3V using two resistors as a simple voltage divider.
3.2 Resistor divider wiring (ECHO → GPIO25)
Example values: 2 kΩ and 1 kΩ.
HC-SR04 ECHO → 2 kΩ → GPIO25
                    |
                   1 kΩ
                    |
                   GND
Any similar ratio around 2:1 is fine (for example 3.3 kΩ + 1.8 kΩ), but 2 kΩ / 1 kΩ is easy.
3.3 Final sensor connections
- HC-SR04 VCC → Pi 5V
- HC-SR04 GND → Pi GND
- HC-SR04 TRIG → GPIO24
- HC-SR04 ECHO → level-shifted line → GPIO25
GND for the Pi, motor driver, motor battery, and HC-SR04 must all be common.
Step 4 - Install Raspberry Pi OS
- Flash Raspberry Pi OS (64-bit) with Raspberry Pi Imager.
- Boot, finish setup, connect network.
- Update:
sudo apt update && sudo apt full-upgrade -y
Code
Motor test (robot_test.py)
import RPi.GPIO as GPIO
import time

GPIO.setmode(GPIO.BCM)

IN1, IN2, IN3, IN4 = 17, 18, 22, 23

for p in (IN1, IN2, IN3, IN4):
    GPIO.setup(p, GPIO.OUT)

def stop():
    for p in (IN1, IN2, IN3, IN4):
        GPIO.output(p, 0)

def forward():
    GPIO.output(IN1, 1); GPIO.output(IN2, 0)
    GPIO.output(IN3, 1); GPIO.output(IN4, 0)

try:
    forward()
    time.sleep(2)
    stop()
    time.sleep(1)
finally:
    stop()
    GPIO.cleanup()
Run: python3 robot_test.py
Obstacle avoidance (concept)
Loop: measure distance. If under 20cm - stop, turn, continue. Otherwise drive forward.
Videos that help (embedded)
These are external YouTube videos. If one ever disappears, the text tutorial still works.
Install Raspberry Pi OS with Raspberry Pi Imager.
HC-SR04 distance sensing on Raspberry Pi.
TB6612FNG motor controller wiring basics for Raspberry Pi.
Printable PDF
Download the printable version here: wolfieweb_pi_robot_tutorial.pdf